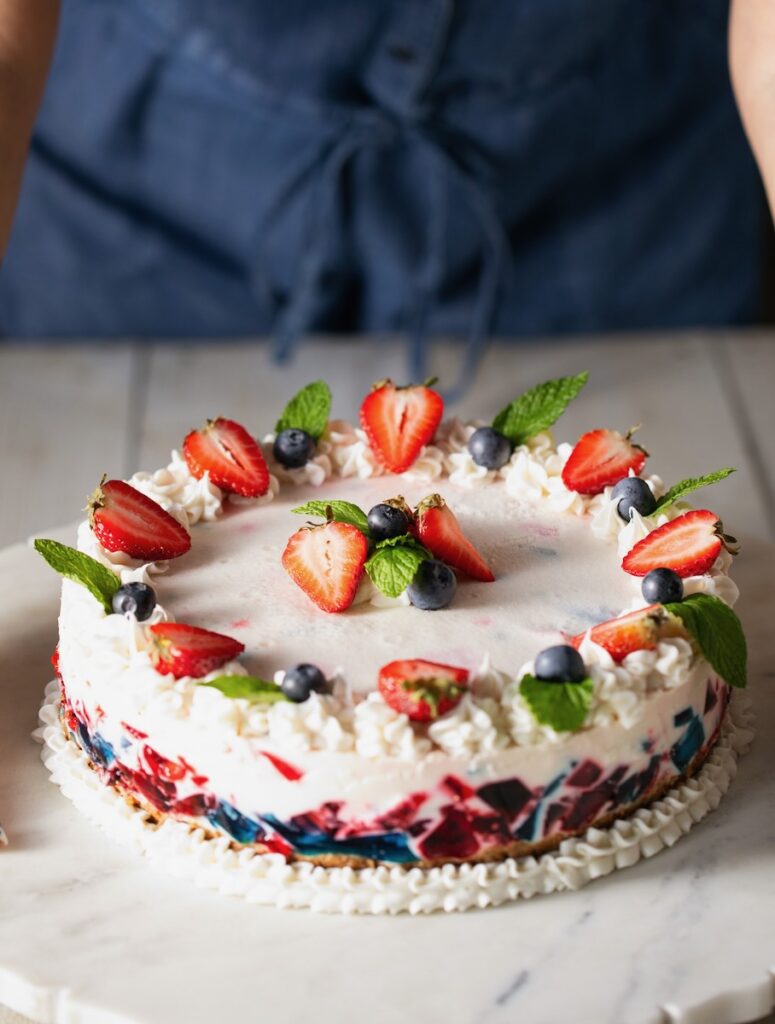
Celebrate Independence Day with a dessert that’s as dazzling as fireworks! This Red, White, and Blue Stained Glass Gelatin Cake is a stunning centerpiece for your 4th of July festivities. Layers of vibrant red and blue gelatin peek through a creamy white base, creating a beautiful mosaic effect. It’s surprisingly easy to make and requires virtually no baking, perfect for a hot summer day. You could even use star-shaped cookie cutters to add another special 4th of July touch. Get ready to impress your guests with this festive and flavorful treat!
What Flavors Can You Use in a Gelatin Cake?
The best part about a gelatin cake is that the customization is up to you. Rework this red, white, and blue gelatin cake to make any occasion. For Halloween you can combine orange and lime green gelatin for a spooky, eerie colored treat. Or, use a flavor combination of lemon and lime to make a summer themed gelatin cake perfect for a pool party. It may even take the place of your regular birthday cake due to its aesthetic inside and ability to pick out the person’s favorite flavors.

Red, White, and Blue Stained Glass Gelatin Cake
Description
A stunning cake that’s almost too beautiful to eat.
Ingredients
For the crust:
- 1 1/2 cups graham cracker crumbs ( approximately 11 whole cracker sheets)
- 1/4 cup granulated sugar
- 1/2 tsp salt
- 6 tbsp unsalted butter, melted
For the gelatin cake:
- 5 (3 oz) pkgs. Jell-O® mix in your choice of red and blue flavors
- 3 1/2 cups boiling water, divided
- 3 1/2 cups cold water, divided
- 1 1-oz pkg Knox® gelatin (use all 4 individual packets in the box)
- 1 14.1-oz can of sweetened condensed milk
- 1 1/4 cups heavy whipping cream
- 1 tsp vanilla extract
Instructions
For the crust:
- Preheat the oven to 350 degrees.
- Use a food processor or place your graham crackers in a gallon size freezer bag and use a rolling pin to crush the crackers.
- Combine the crumbs, sugar, salt, and the melted butter in a medium sized bowl. Mix well, making sure the ingredients are well incorporated.
- Pour into a 9 inch springform pan (ungreased), and press evenly on the bottom and about a 1/4 inch up the sides of the pan. Use the base of a measuring cup or a flat-bottomed glass to create a nice even crust.
- Bake in a 350 degree pre-heated oven for 8-10 minutes.
- Cool completely.
For the gelatin cake:
- Prepare each package of flavored gelatin in a separate bowl (if using multiple packages of the same flavor, they can be prepared together in one bowl). Pour 1/2 cup of boiling water per package into each bowl, stirring until gelatin is completely dissolved (approx. 2 minutes). Then add 1/2 cup of cold water per package and stir. Refrigerate 4-6 hours or overnight.
- Prepare your crust, cool completely and place in the freezer for 1 hour.
- Remove the gelatin from the refrigerator and cut into small pieces of varying sizes, but no larger than 1/4 inch cubes. Place all together in a bowl, toss, and return to the refrigerator while preparing the unflavored gelatin mix.
- Pour 1 cup of cold water into a bowl and sprinkle the unflavored gelatin over the top. Use all 4 packages in the 1 oz box. Let sit for 2-3 minutes. Add 1 cup of boiling water and stir until the gelatin is completely dissolved.
- In a blender, add sweetened condensed milk, cream, unflavored gelatin mixture, and vanilla and blend until well combined.
- Remove the cut gelatin pieces from the refrigerator and your crust from the freezer.
- Spray the sides of your springform pan with cooking spray, transfer the gelatin pieces to the pan, and pour the mixture over the gelatin pieces. Gently use a spatula to make sure things are evenly distributed.
- Refrigerate at least 4-6 hours or overnight (8 hours preferred).
- Remove from the refrigerator and gently run a knife along the sides of the pan before removing the sides.
- Decorate with top with your favorite store bought or homemade icing and fresh berries and mint, or edible flowers.
- Enjoy!
Recipe and Styling by Star Laliberte
Story by Kylie Thomas
Photography by Dave Bryce
Subscribe to TABLE Magazine‘s print edition.